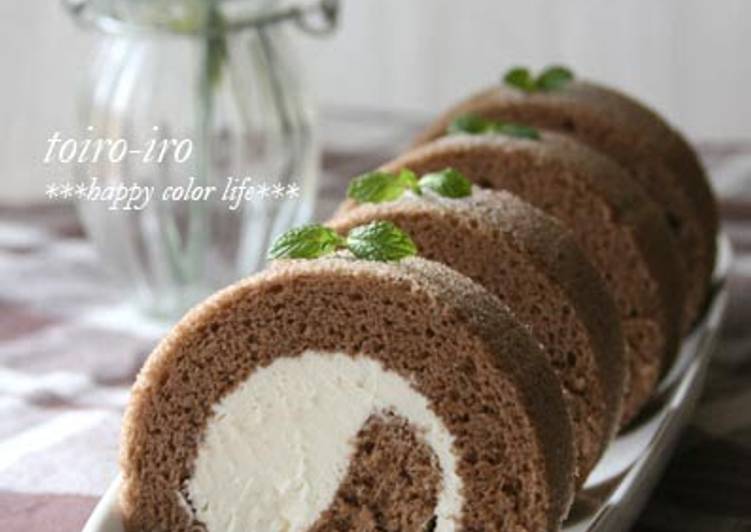
Hello everybody, hope you’re having an incredible day today. Today, I will show you a way to make a special dish, a fluffy cocoa swiss roll sponge. It is one of my favorites food recipes. For mine, I’m gonna make it a little bit tasty. This is gonna smell and look delicious.
Line the baking tray with parchment paper. Combine the ● ingredients and sift three times. Japanese style chocolate cake roll made from a super soft and fluffy chiffon cake that melts in the mouth.
A Fluffy Cocoa Swiss Roll Sponge is one of the most favored of recent trending meals on earth. It’s appreciated by millions every day. It is simple, it is quick, it tastes delicious. A Fluffy Cocoa Swiss Roll Sponge is something that I’ve loved my whole life. They’re nice and they look fantastic.
To get started with this recipe, we must prepare a few components. You can cook a fluffy cocoa swiss roll sponge using 6 ingredients and 24 steps. Here is how you can achieve it.
The ingredients needed to make A Fluffy Cocoa Swiss Roll Sponge:
- Get 35 grams ●Cake flour
- Make ready 5 grams ●Cocoa powder
- Take 3 Egg whites
- Prepare 3 Egg yolk
- Get 70 grams Granulated sugar
- Prepare 1 tbsp Heavy cream
I wanted to make a fluffy sponge cake for a Swiss roll, so I tried making it many times and came up with this recipe. Beating the egg yolk and white separately allows the sponge to be very fluffy! This cake roll required more testing than usual because I was SO torn between using butter vs oil, cocoa powder vs melted chocolate, as well as I learned that it's a VERY thin line between rubbery chocolate sponge cake and good chocolate sponge cake. A line so thin that tightrope walkers would.
Steps to make A Fluffy Cocoa Swiss Roll Sponge:
- Line the baking tray with parchment paper. Combine the ● ingredients and sift three times. Heat the heavy cream in a microwave for 20 seconds. Preheat the oven to 355°F/180°C.
- Whip up the egg whites. Add sugar in 3 portions and whip until stiff peaks form.
- Whip until the meringue becomes like the picture. The ideal form of the meringue is for it to be glossy and not fall from the bowl when you turn the bowl upside down.
- Add egg yolk one at a time, and mix well after each addition. You can continue using the hand mixer!
- If you were able to make a stiff meringue, the foam will not collapse even after adding all three egg yolks, so do this process in one go.
- Add the ● ingredients already sifted three times, take a rubber spatula and fold in the mixture, taking care to not knead the batter. Fold in the flour from the bottom of the bowl, and make sure to leave no lumps of flour.
- Add the microwaved heavy cream and mix. Here too, mix by folding in from the bottom of the bowl.
- Pour the batter into the baking tray from about 15 cm above. Do not pour in the batter on the edges of the bowl or on the rubber spatula. Even out the surface with a dough scraper.
- Hit the baking tray on your working surface to eliminate big air pockets, spray water on the surface well and bake in a 355°F/180°C oven for 12-13 minutes.
- When the sponge is baked, drop the tray with the sponge cake still in it from about 20 cm above. This will prevent the sponge from shrinking.
- If the baking paper does not come off from the sponge smoothly, the baking time is not enough. If the batter is not sticky and you can peel the parchment paper, then the sponge cake is ready!
- Remove the sponge cake by sliding the sponge cake onto a rack, and place an aluminum foil quickly on the surface.
- Turn the sponge cake upside down so that the aluminum foil will face down, and leave the sponge cake to cool. Be careful not to burn yourself. Be gentle, and don't rush and bend the sponge!
- When turning the sponge cake over, it will be easy if you lift the sponge with your left hand with an oven mitten, transfer the sponge to your right hand, and then turn it up side down with your left hand.
- When the sponge cake is slightly cool, remove the parchment paper and place it on the sponge cake. When he sponge cake is completely cool, turn the sponge cake over and remove the surface of the sponge cake stuck to the aluminum foil nicely with your hands.
- Place the sponge on the rack in a big plastic bag to prevent drying. You can also cover the sponge cake with a plastic wrap.
- When rolling the cream, cut the end of the sponge (which will be the end of the roll) into a slant, and use a parchment paper to roll up.
- Shape the cake nicely with the parchment paper or plastic wrap still wrapped around it, and let it sit in the refrigerator for at least 1 hour to let the sponge cake and the cream set.
- The fluffy sponge will be soft even after letting the cake sit in the refrigerator over night!!
- I bought the baking paper at confectionery shop, but you can also use parchment paper. Baking with a baking paper will allow the cake to be baked with a more natural color, so I personally like baking paper!
- When cutting the cake, it will turn out nicely if you boil hot water in a frying pan, dip the kitchen knife in the hot water for about 10 seconds, wipe off the hot water from the knife, and cut by pulling the knife towards you.
- After cutting, place a piece on a wax paper and place it in a transparent plastic bag for the wrapping! This is one way to wrap the cake for gifts.
- Increase the cake flour amount to 40 g, and you can make a plain sponge cake for a plain Swiss roll. Do not remove the browned surface of the sponge, and use it for the outside of the Swiss roll.
- This is an easy way to wrap using a wax paper and a hemp twine. Wrapping the cake loosely is the key for this wrapping method. This is an Earth-friendly wrapping.
Making this delicious chocolate Swiss roll takes just a few simple steps. For the (moist, fluffy and decadent) gluten free chocolate sponge How do you decorate a Swiss roll? The options are endless - from a dusting of cocoa powder or powdered sugar, to fancy chocolate shards and swirls of. Vanilla Swiss roll cake is fluffy as cloud and light as snow. This cake represents everything good, feather-light and the filling make it extremely delicious.
So that’s going to wrap it up with this special food a fluffy cocoa swiss roll sponge recipe. Thank you very much for your time. I’m sure that you will make this at home. There is gonna be more interesting food at home recipes coming up. Remember to save this page on your browser, and share it to your family, colleague and friends. Thank you for reading. Go on get cooking!