Hello everybody, I hope you’re having an amazing day today. Today, I will show you a way to prepare a special dish, vickys lego cake - decoration idea. One of my favorites food recipes. For mine, I will make it a little bit unique. This is gonna smell and look delicious.
Vickys Lego Cake - Decoration Idea is one of the most popular of recent trending meals in the world. It’s easy, it’s fast, it tastes yummy. It’s enjoyed by millions every day. Vickys Lego Cake - Decoration Idea is something that I have loved my whole life. They’re nice and they look fantastic.
Buy products related to lego cake decorations and see what customers say about lego cake decorations on Amazon.com ✓ FREE DELIVERY possible on eligible purchases. How To Make ADORABLE LEGO Cakes Cake Decoration Ideas by Cakes StepbyStep *For more amazing videos make sure to SUBSCRIBE and enable ALL notifications so.
To begin with this particular recipe, we must first prepare a few ingredients. You can have vickys lego cake - decoration idea using 6 ingredients and 30 steps. Here is how you cook that.
The ingredients needed to make Vickys Lego Cake - Decoration Idea:
- Take 1 x 9" layer cake of choice (I made 3 layers)
- Prepare 2 kg white ready roll icing / fondant
- Get food gel dye in yellow, red and blue
- Make ready lego brick and figure silicon moulds - I bought mine from Ebay for just a few bucks
- Make ready edible ink pen in black and red
- Make ready 1 kg buttercream icing, free-from recipe below
How clever are these building block cake decorations? They're simple to make and perfect for jazzing up any cake or cupcake - and they look just like real LEGO! They're the perfect way to top cakes for kids' parties too. Decorate a Lego Cake the easy way with minigures and a personalized cake topper. #legoparty #legos #legobirthday #kidsbirthday #partyideas.
Steps to make Vickys Lego Cake - Decoration Idea:
- Split your white fondant into 4 equal portions and ready your gel colourings. I love these ones by Wilton
- Knead the red gel into a quarter and repeat with the other colours for 2 more quarters. Mix some yellow and blue to make green for the last quarter of fondant
- Tear off 4 balls of yellow fondant a bit bigger than your lego figure shape and knead until nice and pliable. Do the same with 4 balls of any of the other colours
- Really pack the fondant into the moulds so you get into all of the little spaces
- Use a sharp knife to slice the excess fondant away and pat the back of the figures down nice and flat
- Put the mould into the freezer for 20 minutes
- Meanwhile, do the same with the lego brick moulds. Use enough fondant to firmly fill each mould, slice off the excess, pat down neatly then freeze for 20 minutes
- Take the figures out of the freezer and make sure they've set hard. Gently pull the silicon moulds away and pop them out
- When you take the moulds out of the freezer the fondant will immediately start to sweat so you need to work quickly
- On top of a sheet of greaseproof / parchment paper, cut the heads and arms off of all the yellow figures and set aside. You can get rid of the rest of the yellow bodies. Roll them up and add them back into the yellow fondant ball
- Now cut the heads and arms off the rest of the figures and disgard those. We don't need them and you can add them back into their coloured balls too
- Separate the legs from the bodies and now the fun begins!
- Use a bit of water and a small paintbrush to 'glue' the yellow arms and heads onto different coloured torsos
- Do the same to add the trousers in a different colour
- Set your Frankenstein creations aside on the greaseproof paper to set and harden. They'll probably be sweating by now but don't worry, they will dry and firm up. Just leave them uncovered
- Do the same thing with your lego bricks. Pop them out and then cut some in half lengthways, some widthways and cut some into quarters or a third and a quarter
- Repeat until all your fondant is used up. This will make a good amount of bricks, between 60 and 80, maybe even more depending on the sizes of your moulds. I made 48 actual lego sized bricks 3cm x 1.5cm then 38 larger ones 4.5cm x 2.5cm plus 4 small figures and one large
- Let your fondant sit, uncovered in a cool, dark, dry place for at least 4 days until solid. A tip for setting it more quickly is to mix 3 tsp of powdered CMC or Tylose (look in the baking aisle) with every 450g / 1 pound of fondant you use. Or use a mixture of 50/50 fondant / gumpaste
- Once your lego figures have set, you can add the face details on with the black edible ink pen
- My recipe for buttercream is 175g icing sugar, 75g Stork margarine (gold foil block is dairy and soy-free) and 1tsp vanilla extract. This is enough for 1/2 cupcakes or a 9" single layer so I scaled it up by 4x to ensure I had enough
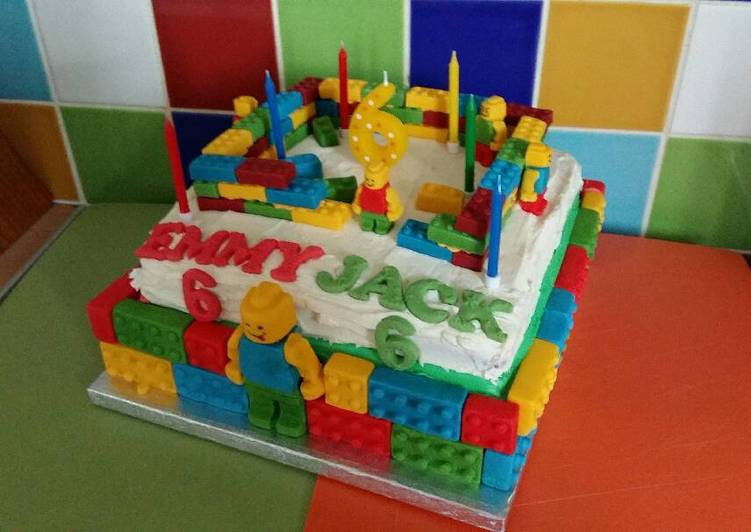
- I wanted to stick with the primary colour theme so when I came to layer up my cake I divided 1kg of buttercream icing into 5 bowls and coloured one bowl red, one yellow, one green and one blue leaving the last white. I piped each colour individually onto my bottom layer then placed the middle on top. I repeated piping the buttercream onto the middle layer ready for the top layer ready to go on
- After I put the top layer on I used the leftover coloured buttercream to cover the edges all around the bottom and middke layers and the white to do the top layer. Then I started to lay my bricks
- I kept building up the sides with my larger bricks until I was happy
- Then I used the smaller bricks to start to build my walls for the top of the cake. I also added the twins names in fondant lettering
- To finish I used more buttercream as mortar to keep the walls from falling down lol, and added the figures and candles
- Just add your bricks as and where you like. You could cover a whole cake if you like for a really great effect or you could use a sheet of fondant over a thin layer of buttercream for a neater and smoother finish on the cake itself. You could also do cupcakes and top each with a buttercream swirl and a few bricks
- My finished cake, right side
- Left side
- Back
- And sliced with the rainbow buttercream layers
Lego Anakin Cake ~ Make your own Lego Anakin cake for your Lego Star Wars party. Lego Party Ideas & Printables ~ Find DIY ideas and free printables for party games, invitations, craft, favors, and food for a fun and colorful kids LEGO Birthday party your. Unfollow lego cake decoration to stop getting updates on your eBay feed. You need A LEGO Birthday cake or LEGO cupcakes for a LEGO party, and you can make your own LEGO cake with these easy LEGO cake instructions and tutorials! Make your own edible chocolate LEGO bricks with this LEGO candy mold, then decorate with flavor and color of cupcakes and frosting!
So that’s going to wrap it up for this special food vickys lego cake - decoration idea recipe. Thank you very much for your time. I’m confident you can make this at home. There’s gonna be interesting food in home recipes coming up. Don’t forget to save this page on your browser, and share it to your family, friends and colleague. Thanks again for reading. Go on get cooking!