Hey everyone, it’s Jim, welcome to our recipe site. Today, we’re going to make a special dish, japanese angel soft milk loaf. One of my favorites food recipes. For mine, I will make it a little bit unique. This is gonna smell and look delicious.
Japanese milk bread uses tangzhong, a cooked paste of flour and water to increase the moisture content in this loaf, yielding one that rises taller and stays fresher longer. Japanese Milk Buns are known for their distinct, milky taste and their soft, melt in your mouth texture. These soft dinner rolls are perfect with any kind of jam or spread but are delicious on their own.
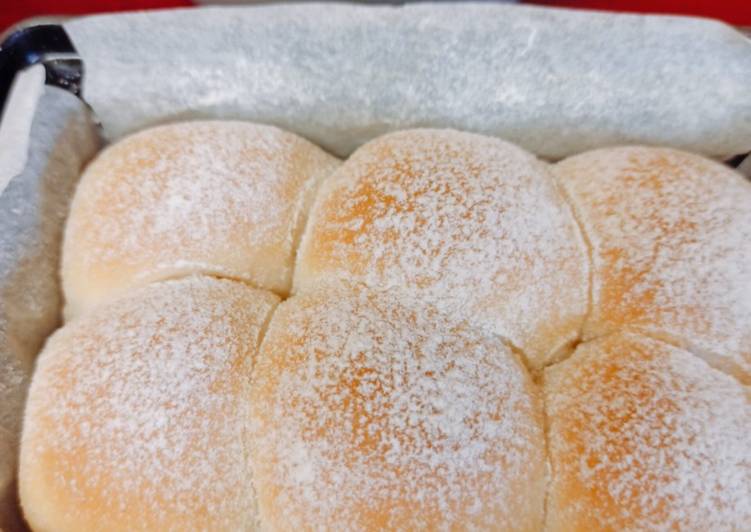
Japanese Angel Soft Milk Loaf is one of the most well liked of current trending foods in the world. It’s appreciated by millions daily. It is simple, it is fast, it tastes yummy. Japanese Angel Soft Milk Loaf is something that I’ve loved my entire life. They are fine and they look fantastic.
To get started with this recipe, we must first prepare a few ingredients. You can cook japanese angel soft milk loaf using 15 ingredients and 17 steps. Here is how you can achieve it.
The ingredients needed to make Japanese Angel Soft Milk Loaf:
- Prepare 92 g (184g, not ml) whole milk or (12g skim milk and 80g water)
- Make ready 1.5 g (3 g) dry yeast
- Prepare 125 g (250 g) strong flour or wholemeal flour
- Get 1 table spoon or 15g sugar (2 tablespoons or 30g)
- Prepare 1.5 g or 1/4 tsp (3g or 1/2 tsp) salt
- Get 10 g (20 g) unsalted butter, room temperature (If you use salted butter, reduce the salt amount.)
- Prepare nuts and seeds - option
- Make ready 【With 120g raisin yeast starter dough】 example
- Get 120 g (240 g) raisin yeast starter dough
- Take 65 g (130 g) strong flour = 125-(120/2)
- Get 20 g (40 g) whole milk = 92x0.87 -(120/2)
- Prepare 4 g (8 g) skim milk = (120/2)x0.13
- Get No dry yeast
- Make ready The rest of the ingredients remain the same
- Get Rasin Yest starter at:https://cookpad.com/uk/recipes/13322647
I have a Bosch mixer that can handle. This light and fluffy Japanese milk bread features a smart technique that keeps the sandwich bread soft and Milk bread (also known as Hokkaido milk bread) is a lightly-sweetened Japanese white bread Place the coils seam-side down in the loaf pan with the spirals against the long side of the pan. This pillowy soft, subtly sweet sandwich bread is a beloved breakfast staple in Japan and is typically eaten sliced very thick, lightly toasted, and served with accompaniments like butter and jam. When we published our Japanese milk bread recipe earlier this month, our Test Kitchen worked with Alessandra Gordon, owner of Seattle-based purveyor The adapted method cuts out a few steps in the shaping process, but the result is a loaf as soft, white, and tender as any.
Steps to make Japanese Angel Soft Milk Loaf:
- Lay parchment sheet or oil the bread tin
- Heat the milk in a microwave about 20 (40) seconds to make it warm. Or just heat it up in a pan. Please never make it too hot as yeast will die at 60 degrees. Around the temperature of bath would be perfect. If it is too hot, leave it till it becomes warm.
- Add yeast into the warm milk and mix well.
- Add flour, sugar, salt in a bowl or on board and mix them. Then, add the warm milk and mix them. Then, knead by hands for about 10 mins on a board or knead for about 10 mins with a stand mixer using a kneading hook. The time will depend on your machine.
- Please knead well here until the dough becomes stretchy and gluten is formed. When gluten is formed, you touch the dough and it doesn't stick to your hand. Also if you stretch it becomes very thin sheet almost see-through it. I use speed 2 or 3 on my stand mixer. If you too strong, it becomes very sticky.
- Add chopped or very soft butter and knead further for about 3-5 mins until the dough becomes smooth and not stick to the bowl like the last photo. I should look silky and smooth.
- Take the dough out and make it round with the motion on tucking inside at the bottom. It should become smooth like the photos below. If it is still too sticky, you need to knead with hands until it becomes easier to handle it. I usually hit it like a ball and it will become less sticky and smooth. - - Add seeds or nuts if you wish. Cover it with cling film and leave it for 30-40 mins until it becomes about twice. It can take much longer. I put a hot water with 36-45℃ beneath like the last photo.
- Test the fermentation with a finger coated by flour. If it is the hole remains, the first fermentation has been done.
- After having tested the fermentation, take out the dough and punch it down. Make it round again. Cut it into 8 (16) or 6 (12) pieces depends on how you like. Make them round. Place them in with the tucked parts as the bottom. Cover it with a damp cloth and leave 15 mins. - - (You could omit this resting step. However, you will get a better result if you do. When I prepare at night and leave them in the fridge, I omit it as it seems it does not make many differences, if I leave them in the fridge.)
- Make them round again with the motion of tucking and place them in the bread tin with the tucked parts on the bottom. Add some more seeds on the top, if you wish. - - (If you wish to bake them in the morning, you could leave them overnight in the fridge till next morning.)
- Leave it in a warm place until it becomes 2-2.5 times, usually for about 30-60 mins, depends on the room temperature and the yeast. Dust them with flour. (The second fermentation) - - If you left them in the fridge overnight, please put them in a warm water bath beneath or something. Otherwise, it will take for ages to get this second fermentation done. When the yeast was strong, it is already ready to bake when you take out from the fridge. Then, omit the second fermentation. )
- Preheat the oven at 180℃.
- Put the bread tin in the oven and turn down the temperature as 160℃. - Then, bake at 160℃ for about 18 mins. Please make sure you reduce the temperature to 160℃. If you bake at 180℃, your bread becomes harder. If your oven is powerful enough and it does not go down the temperature when you open, just preheat it as 160℃.
- After having baked for 18 mins, it is done. You can see the video of how soft they are at: https://www.instagram.com/p/B_YWiW6nIfo/?utm_source=ig_web_copy_link
- You can make character breads with this dough such as bear, cat, Totoro, rabbits etc which children love. - - Bear recipe is here. https://cookpad.com/uk/recipes/12351787-milk-bear-loaf1. Decorated with those.
Commonly known as Hokkaido milk bread or Japanese milk bread, or milk toast, this super soft and fluffy bread has always been my preferred bread. Since this bread does not necessarily require ingredients from Hokkaido, Japan, I like to just call it soft milk bread for the sake of simplicity. very very soft bread. this method doesn't require machine to knead the dough. and we did not knead the dough for a long time by hands neither. however the texture of the bread is so soft and fluffy. this one is used water instead milk in the recipe. This is Gao, thanks for watching and see you next time Haoliyuan Taro Milk Candy with Calcium. Good taro smell, Sweet and oily taste. Perfect for a delicious treat on the go, or a movie at home.
So that’s going to wrap this up with this exceptional food japanese angel soft milk loaf recipe. Thanks so much for reading. I am confident you will make this at home. There is gonna be interesting food in home recipes coming up. Remember to bookmark this page on your browser, and share it to your loved ones, friends and colleague. Thanks again for reading. Go on get cooking!