Hello everybody, I hope you’re having an amazing day today. Today, I’m gonna show you how to prepare a distinctive dish, homemade cherry preserves. It is one of my favorites. This time, I am going to make it a little bit unique. This will be really delicious.
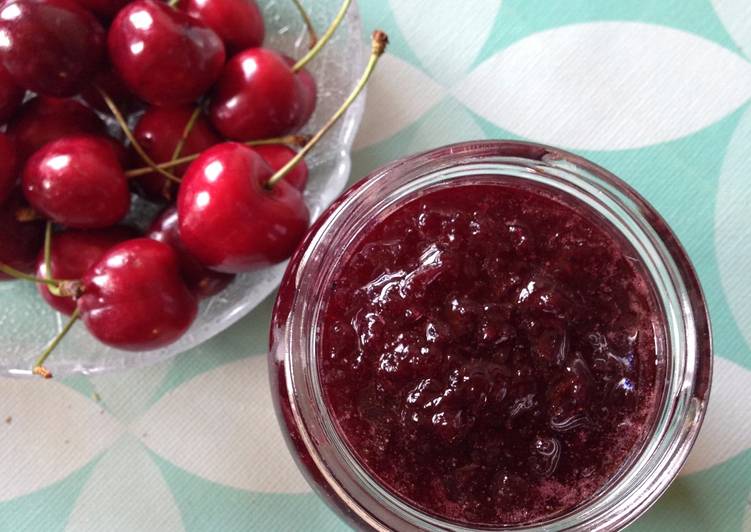
Homemade Cherry Preserves is one of the most favored of recent trending foods on earth. It’s enjoyed by millions every day. It’s simple, it is fast, it tastes yummy. They’re nice and they look wonderful. Homemade Cherry Preserves is something which I’ve loved my whole life.
Wipe the sealing surface of the jars with a clean paper towel, dampened with hot water, to remove any preserves or sugar crystals. Place lids and screw on bands fingertip tight. Process in a boiling water bath for at least ten minutes, depending upon your altitude.
To begin with this particular recipe, we must first prepare a few ingredients. You can have homemade cherry preserves using 3 ingredients and 12 steps. Here is how you cook it.
The ingredients needed to make Homemade Cherry Preserves:
- Get 1000 g cherries
- Take 450 g sugar
- Take 1/2 lemon
This homemade Sweet Cherry Preserves recipe has been sponsored by Northwest Cherry Growers. How to make small batch homemade Sweet Cherry Preserves without pectin. Sweet Cherry Preserves is a delicious dessert topping you don't want to live without. Fresh Cherry Season Homemade Cherry Preserves Recipe.
Instructions to make Homemade Cherry Preserves:
- Stone the cherries (it's about 900 g after stoning). Puree before putting in pot if you want a smoother consistency.
- Put in a medium pot along with the sugar and lemon juice. Yes - it's a lot of sugar, but this is what "preserves" the cherries and prevents them from going bad.
- Turn on medium high. After a few minutes when the cherries softened up a little, I roughly mashed them up with a masher. You can also use a stick/hand blender to break down the cherries some more.
- When the cherries come to a boil, they will foam up. Skim off the foam every several minutes with a spoon - you can put it aside in a little cup and eat it with yogurt or ice cream. It's quite good!
- While the cherries are cooking, place a small plate in the freezer so you can test the doneness of the preserves later.
- Continue to cook the cherries on medium to medium-high stirring every few minutes to ensure they don't burn. The juice will gradually get thicker, darker and gooier. It took mine around 60 minutes to get to that point.
- To test doneness, remove the plate from the freezer and put a little bit of the cherries on it. Place back in the freezer for 2-3 minutes and then take out again. Push the chilled preserves gently with your finger - if it "wrinkles" up, it's done. If not keep cooking. (see photos below)
- This isn't done yet because the preserves are still too watery to hold up with pushing your finger through.
- It's hard to tell in the photo but, here the cherries are gooey and wrinkle a little bit when pushing your finger through the preserves. You can turn off the heat now!
- Let cool off for a few minutes, then transfer to a large jar or two smaller ones. Be careful not to put in cold jars or they can crack (optionally put the hot jam in hot jars). Cover and let cool completely. Store in the refrigerator. It should be good for a few months.
- Really nice with a creamy cheese on bread or toast!
- Some other ideas I've saw on the internet for flavoring: Add a splash of Kirsch liquor in at the end of the cooking. Or a few drops of almond extract (just a little or you'll ruin the taste apparently!), or vanilla bean (maybe cook with the cherries?).
Print These cherry preserves are great on toast for breakfast, the perfect spread to add to your meat and cheese board, or a delectable sauce spooned over a scoop or two of ice cream. These simple cherry preserves are made without pectin but just two ingredients: fresh pitted cherries and sugar. If you don't use a candy-making thermometer to gauge the temperature, have a few saucers in the freezer for testing. How to Make Cherry Jam or Cherry Preserves - Easily! With Step-by-step Directions, Photos, Ingredients, Recipe and Costs.
So that’s going to wrap it up for this special food homemade cherry preserves recipe. Thank you very much for reading. I’m sure you will make this at home. There’s gonna be more interesting food in home recipes coming up. Remember to bookmark this page in your browser, and share it to your loved ones, friends and colleague. Thank you for reading. Go on get cooking!